Welcome to Whim Wham's Craft Blog!

I love to craft, sew, knit, crochet, needle felt...ect. Unfortunately, no one around me shares this passion. So, I am branching out into cyber world, hoping to connect with a few crazy...I mean crafty people like me. Enjoy! :)


Tuesday, March 30, 2010

Spinning Wool at the Brookfield Zoo!

Cora and Malea at Brookfield Zoo

My sister and I took the kids to Brookfield Zoo today.  It was a beautiful day for it too!  The kids were having so much fun going from habitat to habitat, and luckily the animals were agreeable to be seen.  Brookfield also has a small petting zoo within it, so of course they wanted to check it out.
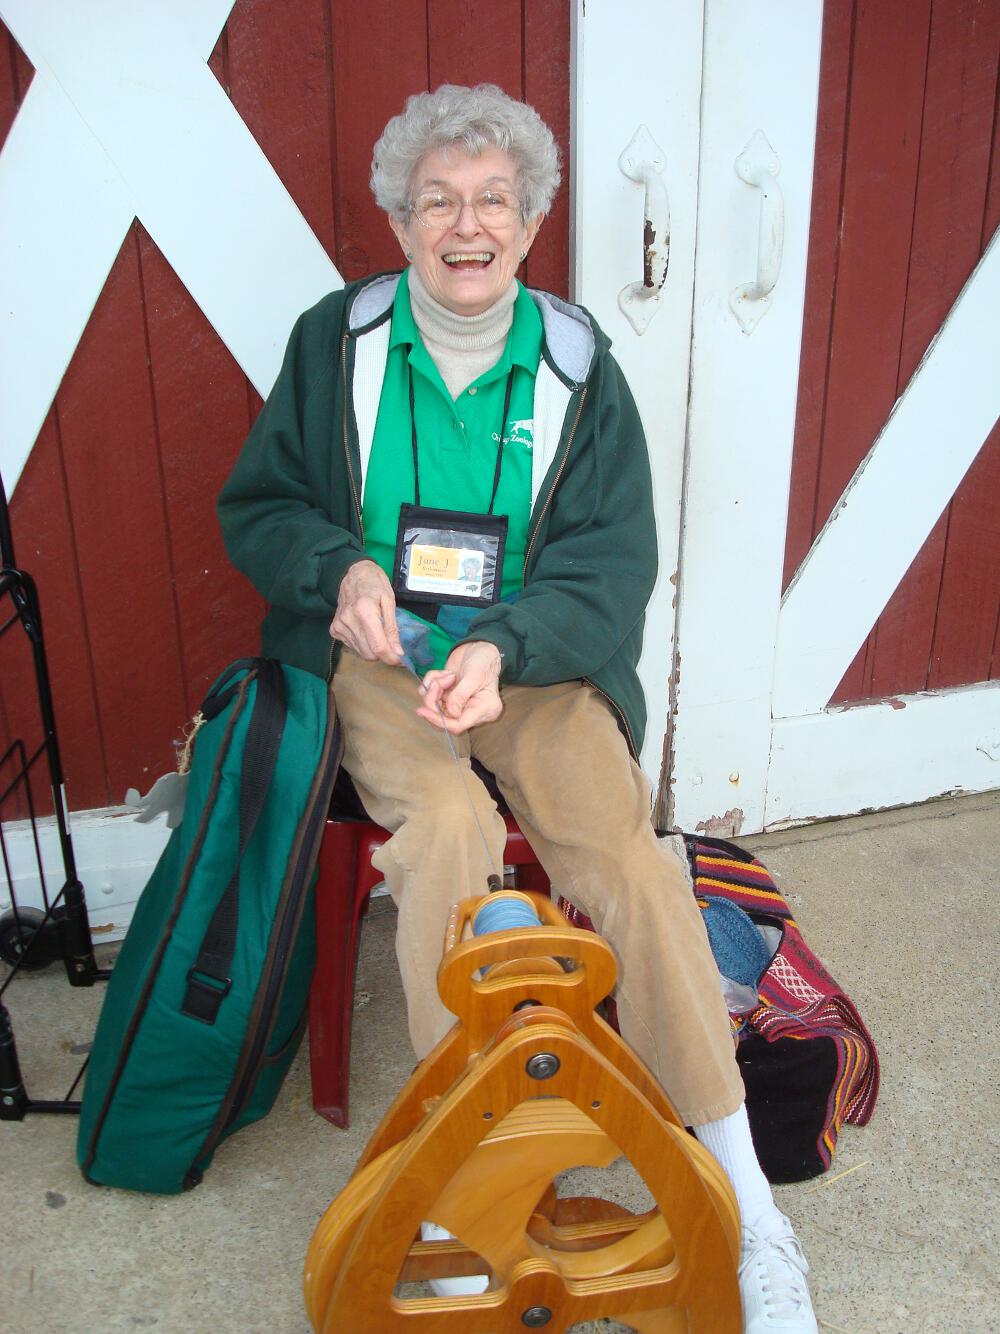
Zoo's are really not my cup of tea.  I do love and enjoy looking at all of the animals.  I just feel a little sad about animals being sort of trapped away from their homes, so I normally don't get overly excited about being there.  Today however was different.  As we walked through the petting zoo, I smiled as the kids pet the goats.  I laughed at how cute and huge the pig was, and looked thankfully upon the sheep....but then everything around me faded and became silent as I was drawn like a magnet to the women with the spinning wheel.  What was this?  This has to be the best trip to the zoo ever!  My sister took the kids by the hands, remarking she knows that she has lost me for a while, and told me to meet up with her when my eyes are unglazed.
June spinning yarn at Brookfield Zoo
So I had a lovely chat with a women named June, whom has been knitting most of her life.  She was spinning on a portable Ashford Joy spinning wheel, which I watched her pack up in about 1 minutes time.  It was a real treat today, and totally unexpected to run into someone making yarn at the zoo.  June has a lot of experience through her years of carding,spinning and knitting wool.  She happily answered questions as kids crowed all around her (me being the biggest one!☺).  She also gave me some information about an inexpensive spinning wheel that she has come across.  The spinning wheel is made out of PVC.  She said it is not the prettiest wheel on the block, but that it spins like a dream.  The good news is, it is very inexpensive.  I went to the website of Babe's Fiber Garden, and sure enough you can get a spinning wheel for under $200.  So if function over fancy works for you, you can own your own wheel in no time!  I may have to give it a whorl..get it!

Anyway, thanks for chatting with me today June.  I truly enjoyed meeting you.  Keep teaching those kids to love wool!  You just may have inspired someone to spin today! =)
June spinning yarn at Brookfield Zoo

Sunday, March 28, 2010

New Drum Carder and Dying Wool with Kool-Aid

I got a drum carder last week, and finally got a chance to use it today.  I have wanted one for years, so this was a pretty big day for me.  No more carding for hours on end by hand.  Yes!  Anyway, the one I got is the Fancy Kitty Kitten 90/120 fine fiber drum carder with a brush attachment.  It is made by a very talented wood worker Ron Anderson.  I am very pleased with the carder and the customer service provided.  He seems like a great guy, and really offers these carders at a fantastic price.  If he did not sell these, I probably still wouldn't own one right now.  I find it unbelievable that a hand crafted drum carder sold by an individual, is less expensive then a manufactured one. Crazy huh?  So, if you are thinking about getting a drum carder.  Definitely check out Fancy Kitty.  They sell wool pickers and handmade crotchet hooks too. (I want you to know that I don't receive anything for saying this.  I don't even know Ron Anderson.  I just truly like his products, and good people should be recommended to others!)


Now onto the fun part.  I carded up all of my nasty tangled wool and dyed it with food coloring and Kool-aid.  I put several pieces of roving in the same color dye, and just pulled some out sooner than others for different color saturation levels.  I was very pleased with the outcome and can not wait to do some felting!  Hmmm, what should I make?

There are tons of great tutorials on the web about how to do this, just Google dying wool/yarn with Kool-aid.  Give it a try.  It comes in lots of yummy smelling flavors.  Don't be mean like me though.  I told my daughter the pink one was cotton candy.  I thought she knew I was joking, but she put it up to her mouth and went to take a bite.  I stopped her with just a few fibers on her lips.  No harm done!  She was mad though, grumbling "Mom. You tricked me!"  What can I say...I'm evil!

Thursday, March 25, 2010

Mommy's Little Helper ♥

I finally listed some needle felted hair clips in my Etsy Shop.  It took me long enough...only about 2 years of procrastinating.
I make hair clips that are covered in wool felt, and sew a little needle felted object on them.  I needed to take some photos for the listing, so I asked Cora for some help.  When I asked her, she said "Sure Mommy.  I'll help you.".  It was bedtime when I asked her...I meant we'd take the pictures in the morning.  So, I went to go brush my teeth, and when I came back into the bedroom, this is what I saw.

Cora with lots of hair clips onCora with lots of hair clips on

She said "I'm ready Mommy!".  I said "Oh my.  That's not quite what I had in mind, but yet a very effective way to display all of your clips at once!".
I love my little helper!

(I did also want to note.  These are my daughters hair clips, not the ones I am selling.  I don't want people to think we put them in our hair before I sell them!☺)

Wednesday, March 24, 2010

I Scream, You Scream, We all Scream for Ice Cream!

dolls holding felt ice cream cones


As promised, I have come up with a new addition to the wool felt play food.  It's getting a little warmer outside and Cora keeps asking for ice cream, so I let her have it. (Sugar free of course!)
Do you want your own felt ice cream cone?  Well, here is what you will need to make one:
  • Wool felt squares (tan for the cone and another color for the ice cream)
  • Matching thread for the cone
  • Red wool for the cherry, or seed beads/embroidery thread for the sprinkles
  • Fiber fill/ poly stuffing
  • Scissors
  • disappearing ink pen or chalk
  • ruler
  • Needle and thread (yes hand sewing is involved!)
  • Sewing machine (cone can also be sewn by hand if you have no machine)
  • Wool Felt Ice Cream Cone Pattern - page1 page2
Let's get started!
First, print and cut out the pattern.  Cut 1 cone piece, 1 scoop circle, and 2 scoop drips (I forgot to show the 2 drips cut in the photo. Sorry!)


Once you have all of the pieces cut, we will get started on making the cone look a little more realistic.  Take your ruler and disappearing ink pen/chalk and mark lines going both directions on the cone.  I chose to start from the edge and mark every 1/2", giving me ten lines.  Do this from each edge for a total of 20 lines.  You can make your lines however far apart you would like them.  I found that 20 lines were not that big of deal to sew by machine, since they are so short.  Oh no, I gave away the next part...we will be sewing along these lines with the matching thread.  Line your sewing machine needle up with your marks and straight stitch on your lines.  I sewed all my lines going one direction first, then all of the lines going the opposite direction next. Try not to pull on the felt while sewing, so it does not distort.  You've made your cone look like a sugar cone, yeah!
Now it's time to make it look like a cone.  Put the right sides of the straight edges together and sew across from top to tip with 1/4" seam allowance.  Turn it right side out.  It should now look like a cone, as in the picture below.

What's a cone without ice cream?  First we are going to make the drip of the scoop.  Lay the 2 drip pieces on top of one another and sew along the edge of the curvy part (do not sew the ends closed).  Sew as close to the edge as you can (about a 1/8 " seam allowance).  Clip any curves that need it and turn inside out.  Now take both ends, opened up flat, and place them right sides together.  This will form a ring.  Sew them together with a 1/4" seam allowance.  Fold back in half and admire your new drip ring!  To attach the ring to the cone, slide it down onto the outside of the cone (matching up the seams), and sew along the inside edge (see photo below).


Now it's time for a scoop of ice cream, and some hand sewing!  I find it easier to do a gather stitch by hand rather than by machine for this next step.  On the big circle piece, do a running stitch along the outside edge.  Double up your thread so it will not break when you cinch everything together.  Leave a tail at the starting and end points so you have a way to pull and tie it all together.  Felt is thick, so just keep moving the fabric all together until it's closed like the second picture (leaving an opening for the stuffing).  Tie the threads in a knot, so it doesn't open back up while stuffing it.  Leave the thread and needle attached.  You will need it to attach to scoop.
Take your fiber fill and stuff the cone and the scoop as full as you can.
The next part is kind of tricky, but you can do it!  Place the scoop on top of the cone, holding it down with your 2 fingers (as in the 4th photo).   Use the same thread you used to cinch the scoop, to attach it to the cone.  Sew the scoop on with a ladder stitch.  Make a stitch right below the stitch line of the drip, then right above into the scoop (click the picture to enlarge it for better viewing).  Stitch like this all along the edge until the entire scoop is attached.

That's it!  You're done!  Now embellish it the way you want.  Make another little circle (like the scoop) to make a cherry, or sew seed beads (or embroidery thread) on for sprinkles.  Just make it age appropriate and safe.  We don't want any little ones choking on their ice cream.
Wool Felt Ice Cream Cone


dolls holding felt ice cream cones


I hope you've enjoyed this tutorial.
Do you want to see more felt play food tutorials?  Let me know what you are interested in seeing.

Please leave any comments or questions below, or contact me via email.

Thursday, March 18, 2010

Mushroom Sweater Slippers

mushroom wool sweater slippers

I made another pair of sweater slippers for Cora.  She gave her bird ones to her cousin, because she said they were too big for her.  I made this pair a little bit smaller...so they should fit her for a week or so right???  That's OK, because mom can just make more and more!  Not going to happen!  I told her no more until she outgrows them.
I made mushroom slippers per her request. The mushrooms themselves are appliquéd on, but I did needle felt the spots.  She asked if I could make her mushroom's smile.  So, I still have to needle felt the smiley faces on them.    
This sweater was the thickest felt I have ever worked with.  When I was sewing on the soles, it was almost an inch thick under the presser foot.  What a pain!  I am glad they are done.  
I wonder what I'll make tomorrow?

Wednesday, March 17, 2010

Needle Felted Clover for St. Patrick's Day

needle felted clover

Happy St. Patrick's Day!

I did a little needle felting before bed last night so my little one would arrive to school with a lucky clover in her hair.  I would hate to see her get pinched or get her toes stepped on for not having any green on.
She has quite the collection of hair clips now.  She just put in an Easter request too.  Man, she works me hard!  I better get back in the sweat shop!

I hope you all have a great day!

Tuesday, March 16, 2010

Temp Tattoo Shrinky Dink Jewelry


shrinky dink jewelry

I made this jewelry over the weekend and thought I would share with you how I made it.
The jewelry is made from shrink plastic.  I used recycled plastic containers to make mine.  Plastic that has a recycle #6 on it, usually strawberry containers or take out lids, works like shrinky dink material.  So save up those containers for some shrinking fun!

Anyway, here is what you will need for this project.

Shrink plastic or recycle #6 plastic
Sandpaper
Temp Tattoos and a damp towel
Hole Punch
Oven and a cookie sheet
Acrylic Sealant
Jewelry Findings


Let's get started!
If you are using recycled containers, cut out a nice flat area that contains no writing or label.  Rough up one side of the plastic with some fine sandpaper. Next, cut out the temp tattoos that you like (remember that these will shrink considerably).  Arrange them on the plastic to make sure they all fit.  Once you have them arranged the way you want, peel off the protective backing and apply the tattoos to the rough side of the plastic (just as you would on your skin with a wet towel).

When the plastic shrinks it will be very difficult to cut, so now is the time to cut the jewelry into the shape you want it to be.  Be sure to leave enough room to put a hole for a jump ring or cord. The holes shrink too, so I use a hole punch and eyelet maker to put some decent sized holes into mine. (The penny is there for size reference.)

It's all cut out, and the holes are punched!   Time for the shrinking magic!
Place the pieces tattoo side up on a cookie sheet or aluminum foil, and put them in an oven at around 250-275 degrees.  If the oven was preheated, the plastic will probably shrink right away.  Larger pieces tend to curl up, but usually lay flat again as they shrink.  Once the pieces have shrunk, remove them from the oven and allow them to cool for a few minutes.  Look at the size difference! The other cool thing is the tattoos shrink right along with it.  Neat, right!?
Just spray them with an acrylic sealer for added protection, and add the jewelry findings of your choice.  Enjoy your trash to treasure!

Monday, March 15, 2010

Thirft Store Wool Sweater Finds!

wool sweaters

My supply was running low, so I ran to the thrift store today to look for some more wool sweaters.  I didn't do too bad.  I found 12 decent sized sweaters that are just waiting to be felted!  I wish that I had found some brighter colors.  I would like to have some primary rainbow colors to work with, but I'll take what I can get.  They should all felt up nice and thick!
I can't wait to make myself a new pair of slippers!  Mine are showing severe signs of wear.  You know what it's like when kids are around though.  You make everything for them, and eventually get around to making something for yourself...maybe!  =)

Saturday, March 13, 2010

Hand Bound Mini Leather Journal

Hand Bound Leather Journal
I love the rustic look of a hand bound leather journal.  The softness..the smell..ahhh, so good!
Anyway, I bought a scrap bag of leather at the craft store awhile back, and have been wanting to make a little journal with it for some time now.
Well, last night was my chance.  My grandpa gave me an old guillotine paper cutter, so naturally I had to test it out immediately.  I cut  the paper to 5 1/2" by 4 1/4" pieces.  I folded the pieces in half so that they measured  2 3/4" by 4 1/2".  I made 5 signatures, with 8 pieces in each, for a total of 40 pages.  I measured around the signatures and cut a piece of leather to match.  I also cut 4 slits on the spine to weave the thread through.  I poked holes in 4 different places in my signatures to match up with the slits in the leather, and sewed all of the signatures into place.
To find out more information on how to do this, Google sewing spine of book, binding books, hand binding... etc.  I am a severe amateur at this, but would love to learn more. Like I need to start another craft!  Right????

Friday, March 12, 2010

Picture Pie for Paper Craft and Applique


Ed Emberley's Picture Pie (Ed Emberley Drawing Books)Ed Emberley has a lot of really cute "how to draw" books for kids, so I went to Amazon to get my daughter one the other day.  Well ...while I was looking through them, I saw these neat Picture Pie books. I thought that they would be really cool to use in making appliques (and for paper applique as well). 
Ed Emberley's Picture Pie TwoI think this would be a great way to use up those fabric scraps. I think I am going to cut up a bunch of the shapes from random fabric scraps, and keep them on hand for various projects.  It will be interesting and fun to see what kinds of animals and things Cora and I can come up with.  I always like to involve kids in projects, when I can.  This would be a great one to keep them playing, learning and occupied, while you sew or create something too!
Ed Emberley's Drawing Book of Faces (REPACKAGED) (Ed Emberley Drawing Books)I did end up get a drawing book for Cora too (since the Picture Pie books were technically more for me than her).  I got her a book on how to draw faces.  She is 5 years old, and seemed to have no problems drawing any of these faces.  The drawings are broken down into very simple steps of how to recreate the face you want. We both have had a lot of fun with this book, and she was so proud of herself after completing new works of art.  I think it has really given her a lot of confidence in her ability to draw new things too. 
Cora's magnadoodle board is getting some serious use the last couple of days, and now that school's out, I'm pretty sure I know what we'll be doing tonight!

Wednesday, March 10, 2010

Cora's Wool Felt Play Food Collection


wool felt play food
Cora has been asking me to make her some more felt play food lately. Like the little spoiled girl needs anything else, right? It's hard to resist those big blinky eyes though! I usually only make her things for the holidays, but she's been trying to behave extra good lately, so I came up with something to add to her collection.
I'll post more about it when I have the tutorial and pattern to share with everyone!

Saturday, March 6, 2010

♥ Wool Felt Sweater Slipper Sock Tutorial and Pattern ♥

wool felt slipper socks
I have been making wool felt slipper socks for my daughter for the last 5 years.  She and my niece love them, so I wanted to share with everyone how I make them. 
(This tutorial is for personal use only.  I ask that you please do not sell any patterns or sweater slippers that are made from this tutorial.  Thank you! ☺)

Let's get started!

Here is what you will need.
  • a felted (fulled) sweater
  • scissors
  • paper and pencil for making the pattern
  • pattern weights and pins
  • a sewing machine or a needle and thread if sewing by hand
  • a flexible measuring tape and a willing participant to take measurements on
  • scrap wool for an applique (optional)
  • sewable heat-n-bond or similar for ease of attaching applique (also optional)
Here is a tutorial I wrote on making the pattern:
How to Draft the Wool Sweater Slipper Sock Pattern
(Google docs is glichy sometimes. If files are not available, just put a request of what doc you need in the comments or via email, and I will send you a copy☺)


Once you have your pattern made, lay it out on the sweater.  You want to make sure the sweater you have chosen is big enough for all of the pieces, also to figure out the best layout for the least amount of waste.☺  If the sweater is not big enough, it's not a big deal.  You can always mix and match pieces from other sweaters to complete the project.  For example, use different color soles than the rest of the slipper.  This is a fun thing to do even if the sweater you've chosen is the right size.  Mix and match...make your slippers unique!

Be sure to line up the top edge of the ankle cuff with the sweater ribbing so your slippers will have a nice edge.  It will also enable them to stretch well over your heel when putting them on.

Pin or put weights on the pattern pieces and cut them out.  I usually cut through the 2 layers at once so I end up with mirror images of my pattern.  Just be careful that a seam placement or knit pattern on the opposite side does not differ from the side you are cutting on.  I also make sure that the upper piece and sole are not on the ribbing part of the sweater.  Ribbing is usually wavy and it does not felt like the rest of the sweater.

Another option, depending on the thickness of wool, is to make a double soled slipper for extra cushion.  This is a little more difficult to sew.  If you are not really experienced, you may want to skip it on your first pair.  The sweater I choose was kind of thin, so I choose to double up the sole.
You can also hand sew a leather sole on for added protection.  My daughter just starts to wear out the sole of hers before she needs a new size, so I have never done this.  It would be a good idea for feet that have stopped growing though.  I think it would really extend the life of the slippers.

The following picture shows how I placed my pattern pieces and cut them out. (Do you like my excessive pattern weights?  Hey... Those patterns were going nowhere!)


Now that the pieces are all cut out, it is time to embellish them if you want to. (Unless you want to needle felt a design on them. That can be done later if you place a foam block inside them after they are made.)

Wednesday, March 3, 2010

Watch Out! Contents Could Explode!

I thought this was kind of funny, and wanted to share it.  I usually don't buy soda, but since Cora was sick, I got some Sprite for her upset tummy.  When I gave her the first bottle yesterday, she kind of shook it and  I told her "No honey, you can't shake soda or it will explode all over the place when you open it."
So, today she comes walking in my room, which is just across the hall, carrying a bottle of Sprite.  She was walking super slow, holding it out in front of her, so I asked "Cora. What in the heck are you doing?".  She said  "I don't want it to explode Mom!".  I had forgotten that I told her that yesterday, so now she thinks that soda is very unstable. 
If only she would be this careful with all of her drinks!

Tuesday, March 2, 2010

Nothing kills a happy mood like vomit!

Shortly after my last post, I snuggled into bed with Cora and browsed through Articulate Matter's Flickr Photo's.  (which are so funny to look at!)  They are squid, jellyfish, and octopus set into scenes of everyday life.  Some have so much detail.  Very talented and creative photos. 
Anyway, it was a perfect night.  Cora and I fell asleep hugging each other, sleeping peacefully, until..."Mom.  I think I'm going to be...." followed by which seemed like, never ending vomiting.  The sweet embrace no longer had the same appeal.  She managed to get it on just about everything in the entire bed.
So after our second shower (we had just taken one before bed), and a ton of laundry, followed by more vomiting...I am finally sitting down next to her in a moment of silence.  Well, almost silent.  We are watching Flushed Away.  She looks like she might fall asleep again soon.
How did this night take such a turn?  I suppose too much perfection can make you sick.  I hate to admit it, but I am feeling a little queasy now too.  Maybe it's just from cleaning up her mess.  Please let that be the case.  I have too much to do.  I don't have time to be sick right now, but I do have time for my little funny tummy girl.  I'll take those hugs...vomit and all !

Hope you all had a better night than mine. =)

Monday, March 1, 2010

I've Never Felt Happier!

rainbow of wool felt
I received my order of felt today from Wool Felt Central.  They are having a sale for 20% off until March 7th. 
I had never ordered from there before, but I was very pleased with my purchase.  The colors are pretty true to what they looked like on my monitor and the order shipped quick.  This is what it looked like straight out of the box.
Cora is going to be so excited when she sees all the new colors!  I was so excited to see them too! 
I wish I could just leave it in a pretty pile like that forever, but I can't wait to make something with it.
Oh the possibilities! =)
Related Posts with Thumbnails
 
Blogging tips